
This demonstrates How to change PowerShell Directory. The tutorial begins by demonstrating how to shift to the root directory in PowerShell.
Then you’ll discover how to switch from C to D drive. You will also learn how to Powershell change directory script to the current directory.
You’ll look at how to use command-line utilities in Windows PowerShell. You will discover that utilizing command-line tools in Windows PowerShell to Powershell change directory is just as simple as using the CMD interpreter; but, by executing such commands in Windows PowerShell, you get access to additional levels of capability.
There are instances of changing directories in total throughout the guide. If you’re looking for a specific example, expand the “Browse Post Topics” section below to get to a specific topic.

How to change PowerShell Directory
Total Time: 15 minutes
How To Change PowerShell To Root Directory

Enter the command below and press enter to change the directory to the root directory in PowerShell.
Set-Location \
PowerShell Prompt is in the location “C:\Users\Victo” in my first example. To change to the root of C, I will input the command “Set-Location \” command and press enter on the keyboard. The directory is now in the root of C, as shown in the second figure below.
How to change the Directory One Step from the Current Directory

You may also move directories from one directory to the current one. To do this Enter this command and hit enter to accomplish this.
Set-Location.
In this second example, my current PowerShell Prompt is located in the directory “C:\Users\Victo” However, I want to modify the Powershell change directory to “C:\Users”
How to Change PowerShell Directory From C to D

In the PowerShell prompt, you may also switch from one drive to another. , to switch from drive “C:” to drive “D:”
The command below will do the trick – type it in and hit enter.
Set-Location D:
The Powershell change directory prompt will switch from the old directory, “C:” to the new drive, “D:”
How to change the directory to a specified path

PowerShell also allows you to change the directory to a specific path. To change directories, enter Set-Location followed by the Path parameter and the complete path to which you wish to shift. If the new directory path contains spaces, surround it in double quotes (“_”).
Set-Location -Path [full path]
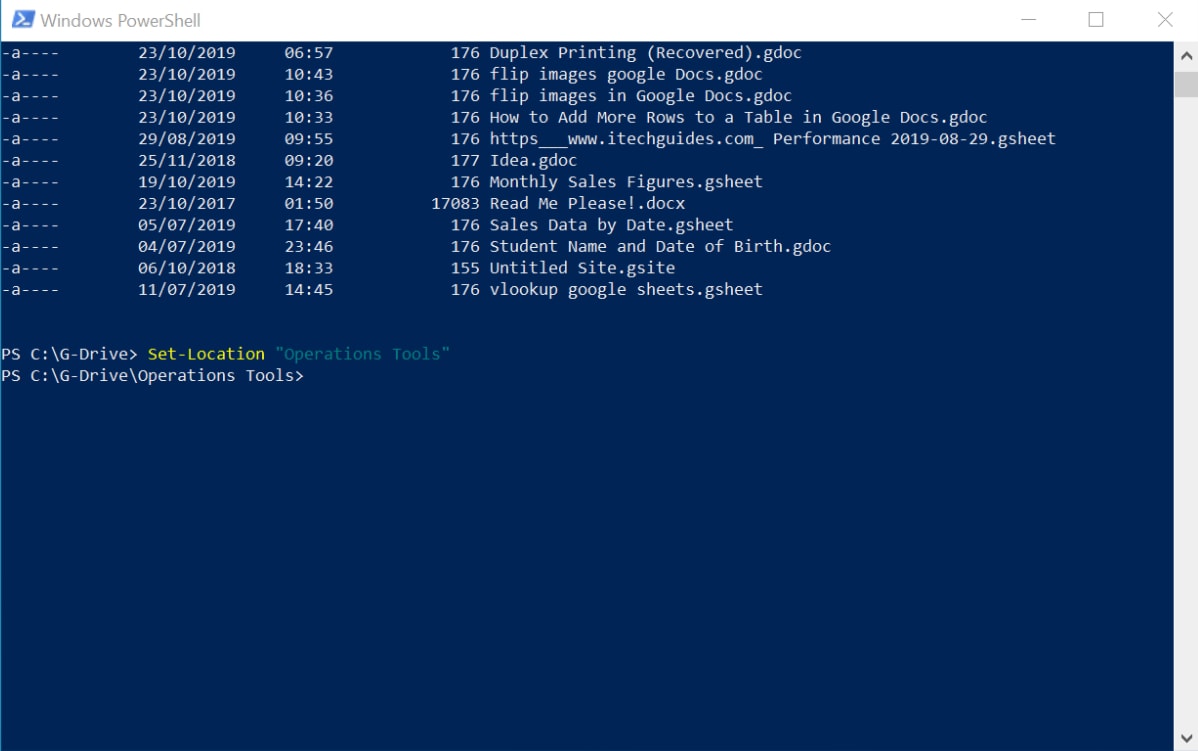
In this example, we will change to “C:\G-Drive”, input this command, and hit enter.
Set-Location -Path “C:\G-Drive”
The PowerShell prompt will immediately change to the new directory.
The same command may be used to change the directory to a path on another drive.
How To Navigate To A Different Directory Within The Current Directory
In this final example, I’ll show you how to shift from one directory to another within the current directory. The first step is to display a list of all directories in the current directory. Enter the Get-ChildItem command to do this.
The screenshot below indicates that I have two folders in the “C:\G-Drive directory: “Operations Tools” and “Work Tools.”
We’ll use the command below to change to “Operations Tools”.
Set-Location “Operations Tools”
The PowerShell prompt will immediately change to the new directory.
How to Change a PowerShell Script’s Directory

When you execute a PowerShell script, there may be times when you need to access the location from which the script is executing. “$Script:MyInvocation.MyCommand.Path”. is an automatic variable.
This variable may be used to determine the directory from which your script is executing. This variable, however, is only available when a PowerShell script is running.
To illustrate, paste the following script into PowerShell and save it as AccessScriptDirectory.
This simple script generates a report of the latest five logs in the “System,” “Application,” and “Security” event logs.
Pay attention to the last three lines. In the third to the final line, I saved the automated variable “$Script:MyInvocation.MyCommand.Path” to a named variable called $ReportPath.
With the Parent argument, the Split-Path command returns the directory from which the current script is executing. This is how you shift to the script Powershell change directory for the sake of this lesson! So, if you don’t choose anything else in this area, make a note of the command “Split-Path -Parent $Script:MyInvocation.MyCommand.Path”.
Then, on the very last line, I added another variable, $CSVReportFile. This variable specifies the location of the CSV file in which I want to save my event log report.
What matters most is that the path to the CSV file is in the current directory where my PowerShell script is executing.
Finally, in the script’s final line, I export the event log report to a CSV file.
Please keep in mind that my script is saved in the directory “D:\PS-Tutorial” As a result, I anticipate that my CSV file will be produced in this place.
#Create a single-key hashtable (LogName) with values – “System”, “Application”, “Security”
$LogNameKeys = @{
LogName = @(“System”, “Application”, “Security”)
}
#Convert the hashtable to a string
$LogNameKeysAsStrings = $LogNameKeys.Values | out-string -stream
#Uses ForEach to loop through $LogNameKeysAsStrings and run the Get-EventLog command.
#Then, save the output of the command in the EventLogReport variable,
$EventLogReport = ForEach ($LogNameKey in $LogNameKeysAsStrings) {
Get-EventLog -LogName $LogNameKey -Newest 5
}
$ReportPath = Split-Path -Parent $Script:MyInvocation.MyCommand.Path
$CSVReportFile = “$ReportPath + “EventLogsReport.csv”
$EventLogReport | Export-Csv -Path $CSVReportFile -NoTypeInformation
After saving the script, launch Powershell change directory as administrator, browse to the directory where you saved the script, and run the following command:
.\AccessScriptDirectory.ps1
After running the script, navigate to the location where you stored the preceding script. The CSV report should be stored in the same folder — my report is shown in the second picture below.
How to Change Directory in PowerShell Using Spaces

It is quite simple to switch to a directory containing spaces. However, if not done correctly, it may result in mistakes.
When moving to another directory containing spaces, it is typical for individuals to forget to surround the directory in double-quotes.
In the Powershell change directory, for example, if I wish to go to the D:\G-Drive-P\Work Tools directory, I will use the command below…
Set-Location “D:\G-Drive-P\Work Tools”
The preceding command works
If you execute the same command without enclosing D:\G-Drive-P\Work Tools in double quotes, you may get an error.
Set-Location D:\G-Drive-P\Work Tools
Finally, the key to converting the directory in PowerShell to one with spaces is to surround the directory in double quotations, “-”.
How to Change PowerShell Directory to Program Files
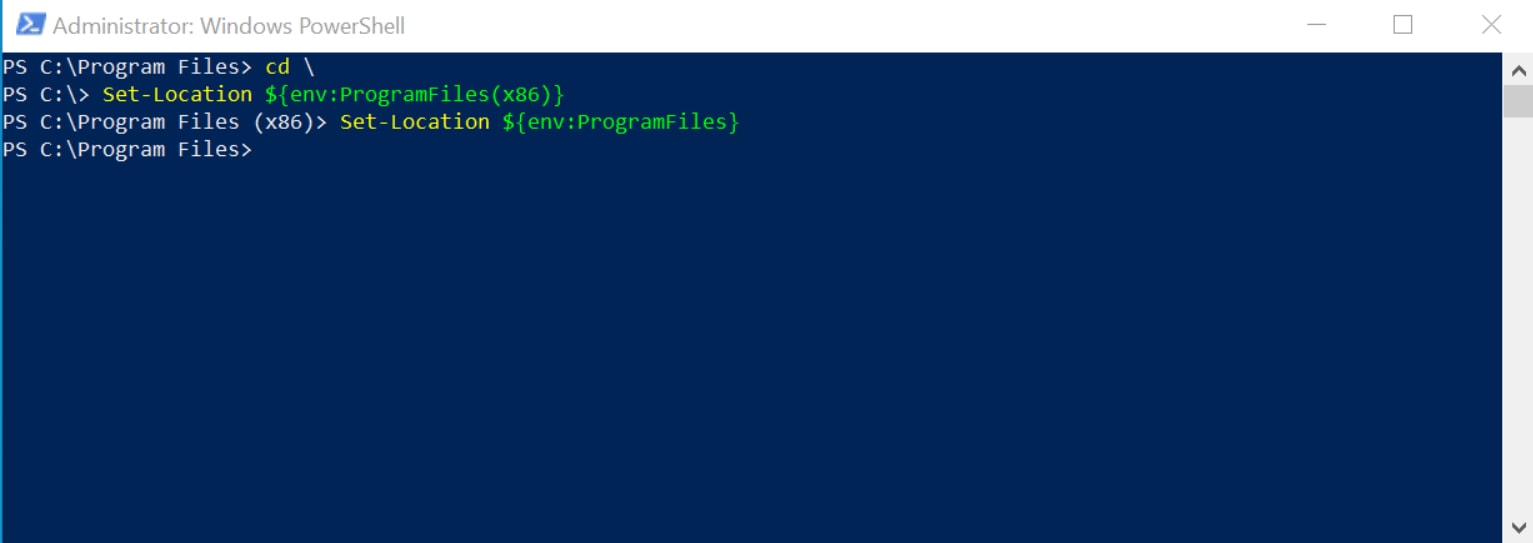
Windows 10 offers two routes for Program Files: \Program Files (x86) and \Program Files. In PowerShell, the easiest method to navigate to these folders is to use their environment variables.
\Program Files (x86) is an environment variable.
${env:ProgramFiles(x86)}
Furthermore, the environment variable for \Program Files is
${env:ProgramFiles}
Run the instructions below in PowerShell to go to these Program File folders.
Set-Location ${env:ProgramFiles(x86)}
Set-Location ${env:ProgramFiles}
Here are the Powershell change directory results.
How to Change PowerShell Directory to Desktop
In the last part, I accessed Program Files using a PowerShell environment variable. PowerShell, as expected, has an environment variable for the path to the current user’s profile.
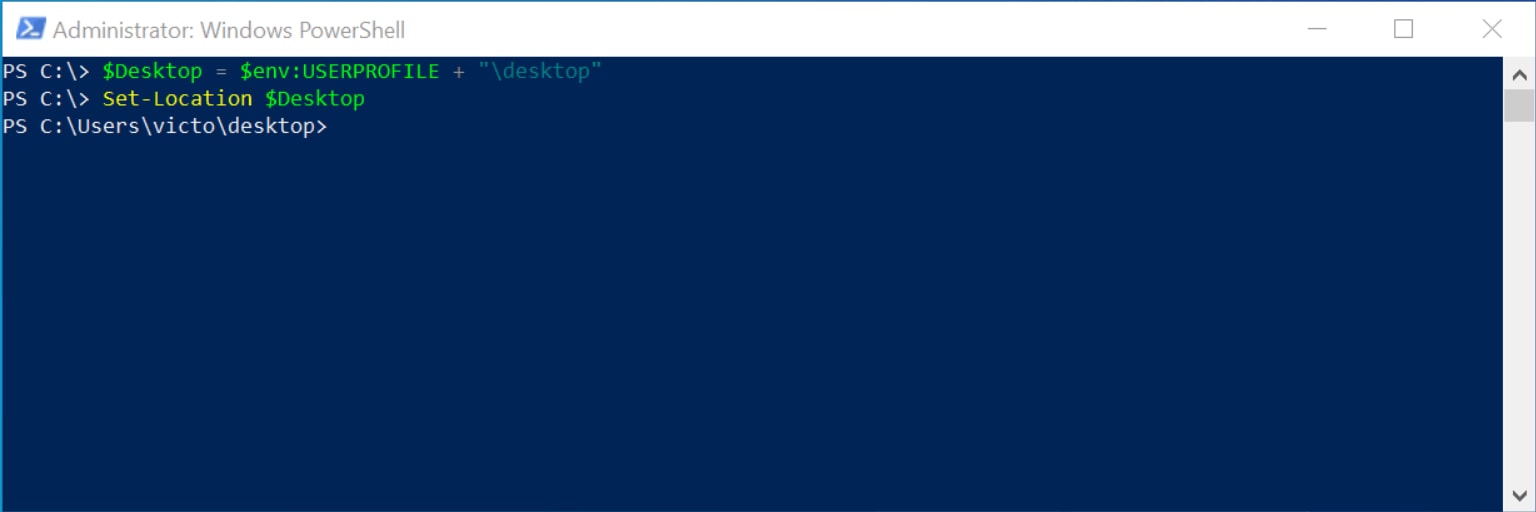
The path to the currently logged-in user’s profile is an environment variable.
$env:USERPROFILE
Run the above command to see the path to your user profile. Mine may be found in C:\Users\victo.
When you examine the path to a user’s profile in Windows 10, you’ll notice a folder called “Desktop.”
So, to change directory in PowerShell to the current user’s desktop, use the instructions following.
$Desktop = $env:USERPROFILE + “\desktop”
Set-Location $Desktop
Because using $env:USERPROFILE + “\desktop” directly in the Set-Path command was throwing all sorts of problems, I stored the location of the desktop folder to a variable.
Here is the output of the Powershell change directory command.
How to Change a Registry Path in PowerShell

PowerShell can access the Windows registry in the same way that it can access files. I highly advise you to study the Abbreviated Registry Key Path portion of our How to Use PowerShell to Read Registry Value tutorial before proceeding with this section.
The registry root key acronyms are provided below based on the information in the above-mentioned instructions.
HKEY_LOCAL_MACHINE – HKLM
HKEY_CURRENT_CONFIG – HKCC
HKEY_CLASSES_ROOT – HKCR
HKEY_USERS – HKU
HKEY_CURRENT_USER – HKCU
In PowerShell, insert the abbreviation of the root key, followed by “:\” – in the Set-Location command to change the directory to any of these registry keys.
I want to modify the directory in the command below to HKEY_LOCAL_MACHINE
Set-Location HKLM:\
Here is the Powershell change directory output
Also Read